


Once you know how to do it, inserting a checkbox in Microsoft Word is a very simple process. But unless you know exactly where to look and what to do, it might prove to be a challenge. But we’re here to help you with a complete guide on how to insert a checkbox in Word – easily.
You have multiple options here: insert a checkbox that you tick with a pen, after you print your document on paper or insert a checkbox that you can fill in Word itself with a cross or tick symbol.
All methods are relatively easy once you know how to do it and they get easier the more you practice them.
We have the stop by step instructions below, complete with screenshots to get you through the task as fast and easy as possible.
We’ll start with the easiest method of them all:
How to insert a checkbox in Microsoft Word
This is the easiest thing that you can do in a few simple steps. This is a checkbox that you will print on your document, to fill on a piece of paper. There are multiple ways to do it, but what we recommend below is the easiest of them all.
Here is what do to to insert a checkbox in Word (works in MS Word 2010 and above):
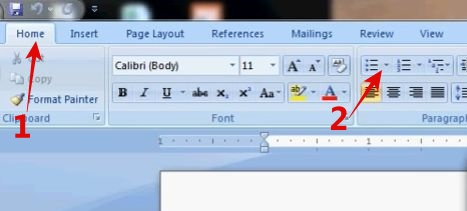
1. Open the document where you want to insert the checkbox in, and click the Home tab in the top bar (this is usually selected by default).
2. There, look for the Paragraph tab below and click the drop down icon next to the Bullet Point Icon:

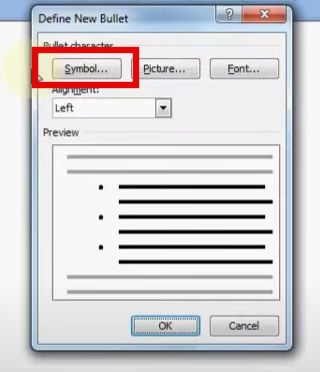
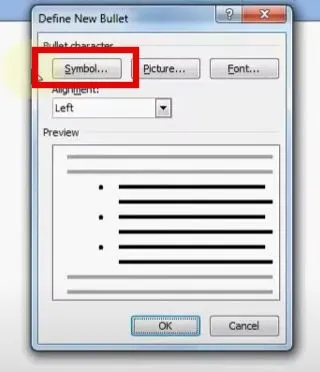
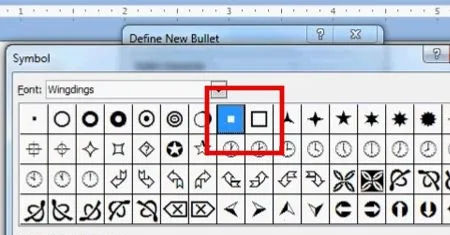
3. Next, click on “Define New Bullet” at the bottom. In the new window, click the Symbol button:
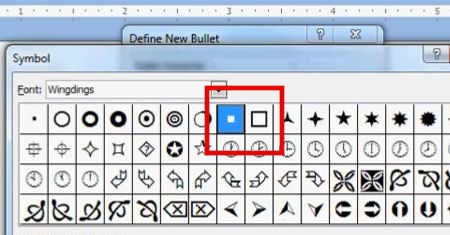
4. In the new window, click the button next to “Fonts” at the top and scroll to the bottom, then select the Windgdings font (your symbol could be in Wingdings 2 or 3 depending on the Word version you are using).
5. Click the arrow next to the symbols to go up, until you find the checkbox one:
6. Click OK, then click OK once more. You’re ready to use it!
Now, you can add those check boxes easily in Microsoft word. Even better, when you hit the Enter key on your keyboard, the next row will automatically insert a new checkbox.
If you don’t want that, simply press Enter once more. You now have full control over inserting these symbols and deciding how many of them you will have.
How to insert a fillable checkbox in Word
If you want the check box to be interactive and to be able to click it with your mouse and tick it, the method will be a bit different. But fortunately, it’s something that you have to go through just once – afterwards it will be easier.
Here is what to do to insert a fillable checkbox in MS Word:
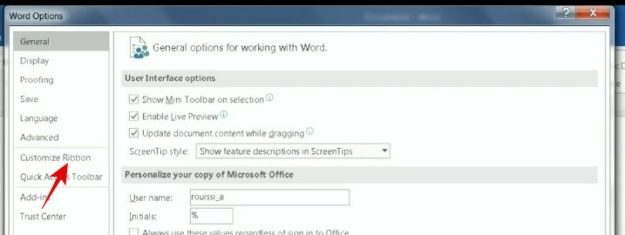
1. With your document open, click the “File” button in the top bar and then click “Options” in the sidebar to the left.
2. In the new window, click the “Customize Ribbon” on the sidebar to the left:
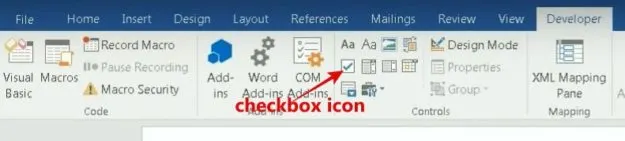
3. In the new window, tick the “Developer” checkbox (located to the right side of the screen). Then click the OK button.
4. This will add the “Developer” button in your top bar, above the document (you only have to go through this once and it will always be there). Click it, and then finally select the checkbox icon to add it to your document:

5. Now, whenever you click that button, it will insert a clickable (aka fillable) checkbox in your document, on the selected line. Just click that square to tick/untick it.
How to change the “X” used to a tick symbol
By default, when you click that box, you will select it with an “X”. If you want a tick symbol instead, that can be done as well. Here is how:
1. Highlight the checkbox you have inserted in your document and click the “Properties” button in the Developer section of the top bar.
2. This will open a new window. To the bottom, you will have the option to change the “Checked Symbol“. Click the “Change” button in order to do so.
3. In the new window, select the Wingdings font once more, then scroll all the way to the bottom and select the tick icon. Click OK twice and you will now select that checkbox with a tick instead of the default X.
Now, to use it on multiple rows, all you have to do is copy and paste the first checkbox you have inserted. A bit more work than with the previous method – but at least it works and you know how to do it!
And this would be it – you have a complete guide on how to add your checkbox, based on your needs: either a square that you can tick off on a piece of paper after you print your document, or one that can be clicked on in the document itself.
If you have additional questions about the methods or any other tips related to this, don’t hesitate to ask below.